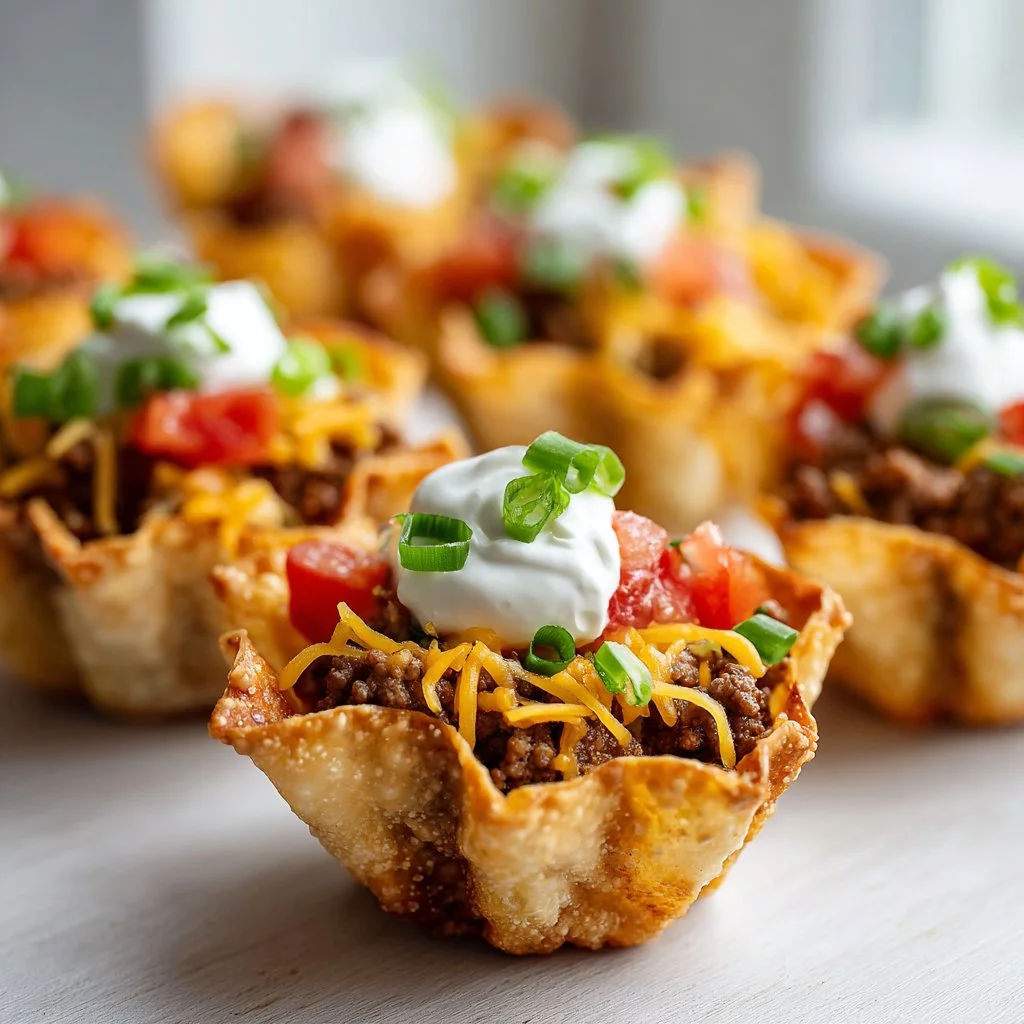
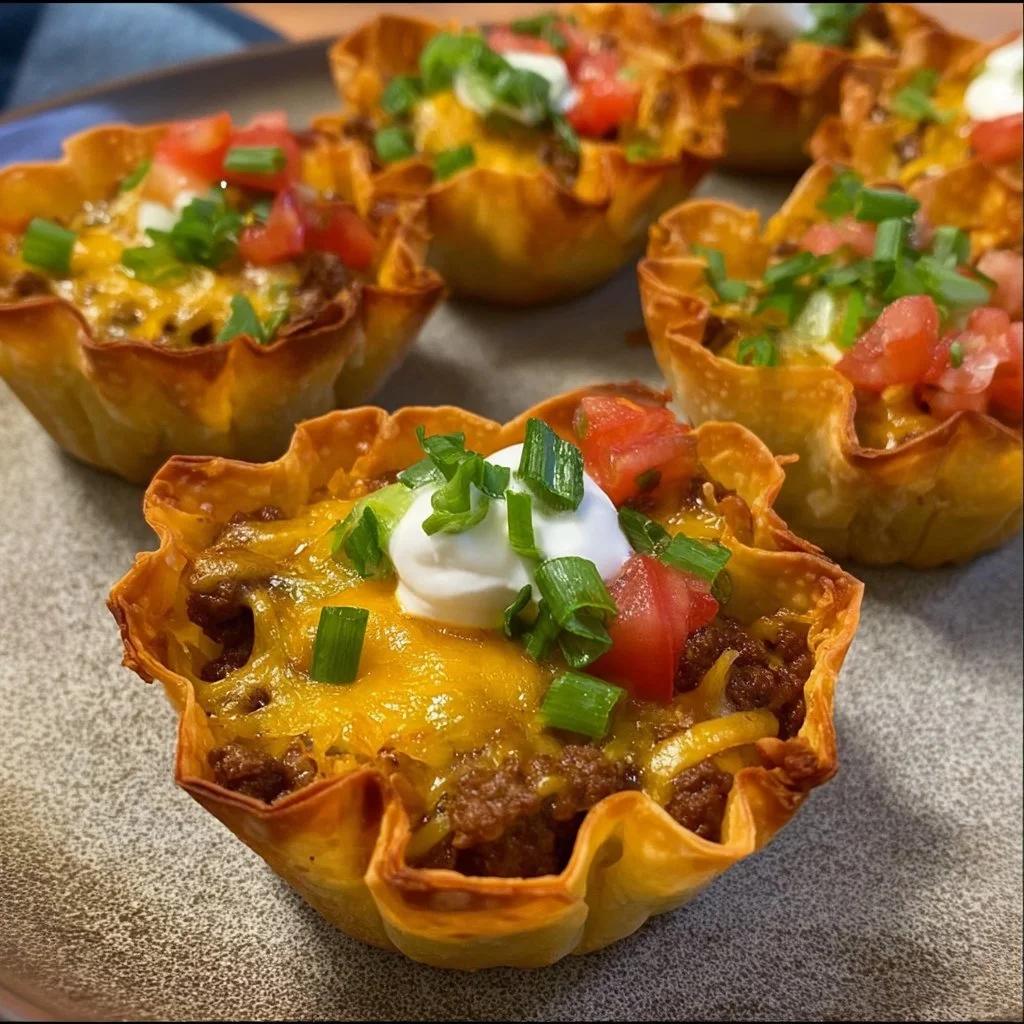
Bright, crunchy, and perfectly portioned — these Taco Cups turn taco night into a bite-sized celebration. They’re fast to assemble, fun to eat, and great for feeding a crowd or packing for lunches.
You only need a few pantry staples to make a tray of crispy cups filled with seasoned beef and melty cheddar. They bake quickly and travel well.
Keep reading for ingredient science, step-by-step visuals, troubleshooting, and pro tips to make the best Taco Cups every time.
Why You’ll Love This Taco Cups
– Bite-sized, handheld tacos that are party-friendly and kid-approved.
– Ready in about 30 minutes from start to finish.
– Minimal prep and pantry-stable ingredients.
– Crispy wrappers that hold warm, seasoned beef and gooey cheese.
– Easy to customize for dietary needs or flavor preferences.
– Portable and perfect for meal prep or appetizers.
These Taco Cups deliver a satisfying contrast of textures: a golden, crisp wonton shell giving way to savory, well-seasoned beef and a creamy hit of cheddar. The flavors are familiar — taco spices, sharp cheese, and bright garnishes — but the cup format concentrates them so every bite is rich and bold.
"I made these for a game night and everyone went crazy — crispy, cheesy, and so easy to eat. I doubled the batch and still ran out!" — 5★ reader review
Key Ingredients for Taco Cups
Ground beef for Taco Cups
Ground beef is the flavor foundation; choose 80/20 for juiciness and flavor, or 90/10 if you prefer less grease. Browning properly builds Maillard flavor that makes the filling taste meaty and robust. If you swap for ground turkey or plant-based crumbles, increase seasoning slightly and add a splash of oil for mouthfeel.
Wonton wrappers for Taco Cups
Wonton wrappers form the crisp, delicate cups that hold the filling. Look for square wrappers in the refrigerated produce section — they crisp quickly and brown evenly. If you substitute with mini phyllo shells the texture will be flakier and more fragile, and bake time may change.
Cheddar cheese for Taco Cups
Sharp cheddar gives a bright, tangy finish and melts well in the short bake. Buy block cheddar and shred it yourself for better melt and less added starch. Swapping to Monterey Jack yields a milder, creamier profile; pre-shredded cheese can be dusted with cornstarch and won’t melt as smoothly.
Taco seasoning for Taco Cups
A taco seasoning packet balances cumin, chili, and garlic for classic taco flavor without measuring spices. Follow packet instructions to add water and simmer for a coherent, saucy filling. Using homemade seasoning gives more control over heat and salt; a little tomato paste or broth can help create a grab-able texture if the mix is dry.
Full Ingredient List for Taco Cups
– 1 lb ground beef
– 1 cup cheddar cheese, shredded
– 1 package wonton wrappers
– 1 packet taco seasoning
– Sour cream (for serving)
– Salsa (for serving)
– Chopped green onions (for garnish, optional)
Step-by-Step Instructions for Taco Cups
Step 1: Preheat the oven to 375°F (190°C)
Set your oven to 375°F and allow it to fully heat while you cook the beef and assemble the cups. A fully preheated oven ensures the wonton wrappers crisp quickly rather than steam.
Pro Tip: Visual cue — the oven should read a steady 375°F and feel evenly hot when you open the door.
Step 2: Brown the ground beef
Heat a skillet over medium and add the ground beef, breaking it up with a spatula. Cook until fully browned and no pink remains, about 6–8 minutes, then drain excess fat carefully into a heatproof container.
Pro Tip: Visual cue — beef should be uniformly brown with tiny browned bits in the pan and no large pink patches.
Step 3: Add the taco seasoning
Return the drained beef to the skillet, stir in the taco seasoning packet along with any water called for on the packet, and simmer until the liquid reduces and coats the meat. Taste and adjust salt or heat if needed.
Pro Tip: Visual cue — the mixture should glisten slightly and cling to the meat, not be soupy.
Step 4: Prepare the muffin tin
Lightly grease a standard 12-cup muffin tin with nonstick spray or a thin coat of oil so wonton wrappers release easily after baking. Pre-greasing also helps the wrapper edges brown attractively.
Pro Tip: Visual cue — each cup should have a thin sheen of oil but no puddles.
Step 5: Press wonton wrappers into the tin
Press a wonton wrapper gently into each muffin cup so the corners form little cups. If the wrapper resists, lightly stretch the edges with clean fingers to fit. For extra crispness, overlap two wrappers in each cup, rotating them slightly.
Pro Tip: Visual cue — wrappers should sit flush in the cup with small pleats, not folded-over clumps.
Step 6: Fill each wrapper
Spoon a heaping teaspoon or tablespoon of the seasoned beef into each wonton cup, then top with a light sprinkle of shredded cheddar. Be careful not to overfill — the goal is a balanced bite that stays inside the shell.
Pro Tip: Visual cue — cups should be about three-quarters full so cheese can melt without overflowing.
Step 7: Bake until golden and crispy
Bake in the preheated oven for 12–15 minutes, watching for the wonton edges to turn golden brown and the cheese to melt. Rotate the pan halfway through if your oven has hot spots.
Pro Tip: Visual cue — edges should be a deep golden color and cheese should be melted and slightly bubbling.
Step 8: Cool slightly and release
Remove the muffin tin from the oven and let the Taco Cups cool in the pan for 2–3 minutes. Use a small offset spatula or butter knife to carefully lift each cup out to a cooling rack.
Pro Tip: Visual cue — cups should hold shape when nudged and feel crisp but not piping hot.
Step 9: Serve with toppings
Plate the Taco Cups and serve immediately with sour cream, salsa, and chopped green onions. Offer lime wedges and extra hot sauce for guests who want more brightness or heat.
Pro Tip: Visual cue — finished cups should be crispy, with molten cheese inside and bright garnish for contrast.
Expert Tips for Taco Cups
– Use 80/20 ground beef for flavor; leaner beef needs a touch of oil to keep the filling juicy.
– Toast wonton wrappers for extra crispiness by brushing edges with oil before baking.
– If cups are soggy, bake a few extra minutes; look for deep golden brown on the edges.
– For even cooking, rotate the muffin tin halfway through baking.
– Use a metal muffin tin for sharper browning; silicone yields softer edges.
– Don’t overfill the cups — a neat portion makes them easy to pick up and eat.
– If cheese bubbles over, line the bottom of the tin with foil for easier cleanup.
– Chill the assembled tray for 5 minutes before baking if using very thin wrappers to prevent sagging.
Storage & Freezing for Taco Cups
Refrigerator: Cool the Taco Cups completely, then store in an airtight container lined with paper towels to absorb moisture. They keep well for 3–4 days and are great for quick snacks or lunches.
Freezer: Freeze cooled cups in a single layer on a baking sheet until solid, then transfer to a freezer bag or airtight container with parchment between layers. Frozen Taco Cups maintain best quality for up to 2 months.
Thawing: Thaw frozen cups in the fridge overnight or reheat from frozen for a crisp finish. If thawed in the fridge, reheat in a 350°F oven for 8–10 minutes.
Reheating: For best texture, reheat at 350°F on a baking sheet for 5–10 minutes until warmed and crisp. Microwaving will warm faster but will soften the wrappers; use a brief 20–30 second microwave burst and finish in a hot skillet if needed.
Variations & Substitutions for Taco Cups
Vegetarian Black Bean Taco Cups: Substitute cooked seasoned black beans for the ground beef, mash slightly, and add a pinch of smoked paprika. The result is hearty, with a creamy interior and a satisfying smoky note.
Chicken Taco Cups: Use shredded rotisserie chicken tossed with taco seasoning and a tablespoon of salsa to moisten. This yields a lighter, slightly tangier cup that pairs well with cilantro and lime.
Spicy Chorizo Taco Cups: Replace ground beef with Mexican chorizo (casings removed) and cook until crisp. Expect a bolder, spicier flavor and a more crumbly texture that’s full of paprika and garlic.
Breakfast Taco Cups: Fill wonton cups with scrambled eggs, cooked breakfast sausage, and cheddar, then bake briefly until warmed. You’ll get a portable, savory breakfast with fluffy eggs and melty cheese.
Frequently Asked Questions About Taco Cups
Q: Can I make Taco Cups ahead of time for a party?
A: Yes. Assemble the filled wonton cups on a tray, cover tightly, and refrigerate for up to 24 hours before baking. Bake from chilled adding a minute or two to the bake time. For a longer hold, bake fully and reheat just before serving to regain crispness.
Q: What size muffin tin should I use for Taco Cups?
A: A standard 12-cup muffin tin yields medium-sized cups perfect for appetizers or snacks. For bite-size appetizers use a mini muffin tin and reduce bake time by 3–5 minutes. For larger handhelds use a jumbo tin and increase filling and bake time slightly.
Q: How do I prevent soggy bottoms on Taco Cups?
A: Ensure you drain excess fat from the beef and avoid overly saucy fillings. Press wrappers firmly into the tin so they brown evenly. If sogginess continues, bake a few extra minutes and consider brushing the inside with a thin coat of oil before filling.
Q: Can I freeze Taco Cups after baking?
A: Yes. After baking and cooling, freeze on a baking sheet until solid, then transfer to a freezer-safe container. Reheat from frozen in a 350°F oven for 8–12 minutes until crispy and heated through.
Q: Are there gluten-free options for Taco Cups?
A: Use gluten-free wonton wrappers or swap to small corn tortillas pressed into muffin cups (lightly sprayed with oil) for a gluten-free version. Bake until deeply golden to crisp the corn and avoid sogginess from thicker tortillas.

Final Thoughts on Taco Cups
Taco Cups are a fast, crowd-pleasing twist on classic tacos that combine crunchy shells with seasoned beef and melty cheese. Give them a try for your next party, game night, or simple family dinner.
Please leave a star rating in the recipe card below and pin this recipe to Pinterest. For more inspiration and similar recipes, check out Crunchy Taco Cups — A Fun and Easy Taco Recipe!, this beef-and-cheese take at Taco Cups with Beef and Cheese – Dinner at the Zoo, and a mini version at Homemade Mini Taco Cup Recipe | Mel’s Kitchen Cafe.
Taco Cups
Ingredients
Method
- Preheat the oven to 375°F (190°C).
- Brown the ground beef in a skillet over medium heat for 6–8 minutes, until fully cooked.
- Drain the excess fat and add taco seasoning, mixing according to packet instructions.
- Prepare a muffin tin by lightly greasing each cup.
- Press a wonton wrapper into each cup, forming little cups.
- Spoon seasoned beef into each wrapper and top with shredded cheddar.
- Bake in the preheated oven for 12–15 minutes until golden brown.
- Allow to cool slightly before releasing from the muffin tin.
- Serve warm with sour cream, salsa, and chopped green onions.