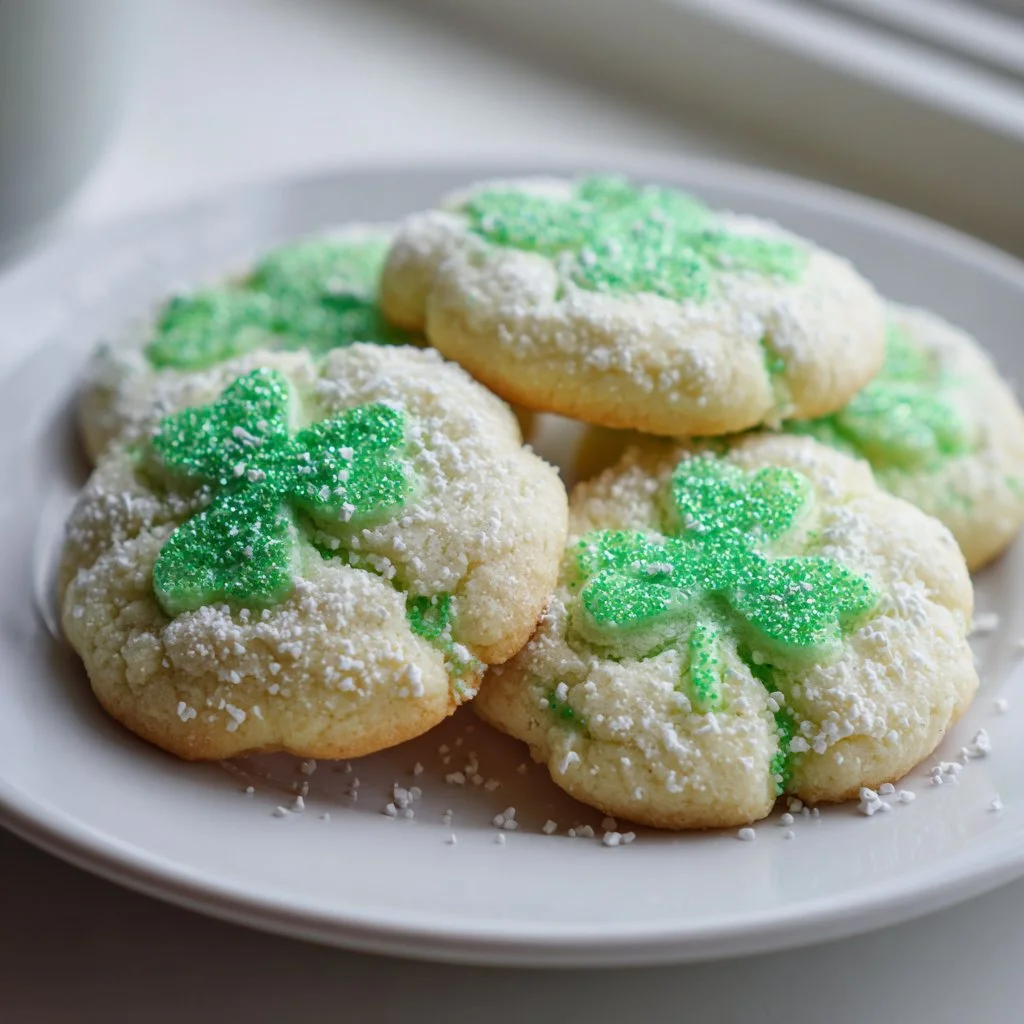
Start your St. Patrick’s Day baking with a recipe that’s impossibly simple and festive. These cookies take just a handful of pantry staples and turn them into bright green, crackled treats everyone will love.
They’re perfect for last-minute parties, school events, or a quick baking win with kids. The dough comes together in minutes and the results are soft, tender, and slightly chewy.
If you like easy shortcuts that don’t sacrifice flavor, you’ll want these in your holiday rotation. For a more decadent cookie idea, I sometimes pair them with a brookie-style bar for variety — it’s an easy add-on that readers love brookie cookies.
Many home bakers also enjoy swapping in nut-forward cookies for variety; try a rich nutty cookie on a different baking day for contrast hazelnut cookies with dark chocolate ganache.
Why You’ll Love This Easy St. Patrick’s Day Cookies
- One-bowl dough for minimal cleanup.
- Uses a packaged cake mix for reliable results.
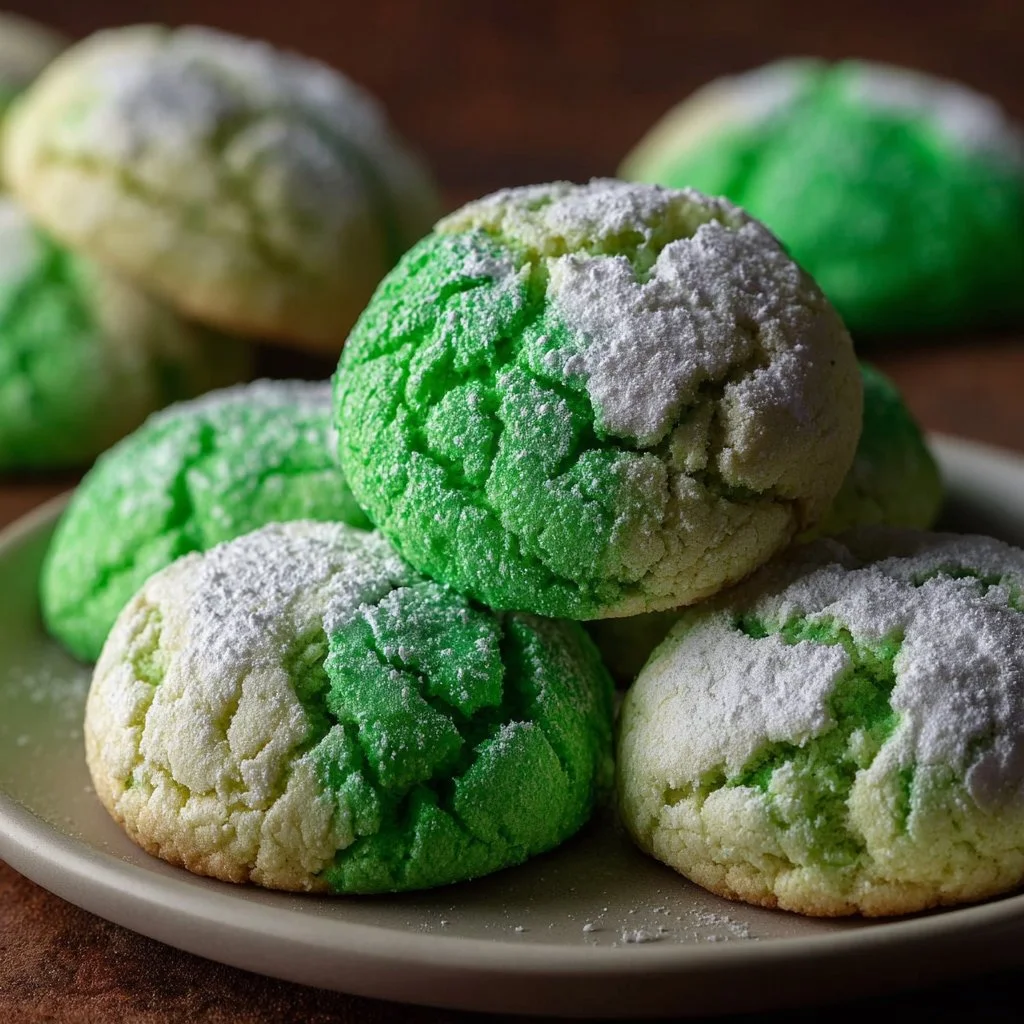
- Bright, Kelly green color with just a drop of gel.
- Soft interior with a crackled, sugary exterior.
- Kid-friendly shaping and rolling steps.
- Freezable dough and finished cookies for advance prep.
These cookies taste lightly sweet with a tender, cakey crumb and a soft chew that comes from the cake mix base and eggs. The exterior crackle and powdered sugar coating add a slightly crisp contrast to each bite, making them feel festive and homemade without hours of work.
"Absolutely perfect for our St. Patrick’s Day bake sale — bright, soft, and everyone asked for the recipe. 5 stars!" — A delighted reader
Key Ingredients for Easy St. Patrick’s Day Cookies
White cake mix (1 box, 15.25 oz)
The cake mix is the backbone of the cookie’s texture. It already contains flour, leaveners, and sugar in balanced proportions, which gives the cookie its tender, cake-like crumb. For best results, choose a good-quality brand and avoid mixes that include pudding or extra add-ins; substituting from-scratch flour mixes will change texture and may need extra fat or liquid.
Large eggs (2)
Eggs provide structure, moisture, and richness. They bind the dry mix and help create that slightly chewy interior. If you substitute with an egg replacer, expect a softer, less structured cookie and adjust moisture carefully — aquafaba can work but results will differ.
Vegetable oil (1/3 cup)
Oil keeps the cookies tender and adds moisture without solidifying like butter. Vegetable oil’s neutral flavor is forgiving here; swapping with melted coconut oil will add a subtle coconut note, while butter will make the cookies slightly firmer and richer.
Kelly green gel food coloring (1/4 teaspoon)
Gel coloring delivers vivid color without thinning the dough. Liquid food coloring can dilute the dough and may require extra flour; for the brightest green with minimal product, gel is the preferred choice. If you prefer natural color, matcha or spirulina can tint green but will alter flavor.
Full Ingredient List for Easy St. Patrick’s Day Cookies
- 1 box (15.25 oz) white cake mix
- 2 large eggs
- 1/3 cup vegetable oil
- 1/4 teaspoon Kelly green gel food coloring
- 3 tablespoons granulated sugar
- 6 tablespoons powdered sugar
Step-by-Step Instructions for Easy St. Patrick’s Day Cookies
Step 1: Mix the cake mix, eggs, and vegetable oil in a large mixing bowl until a sticky dough forms.
Work quickly by cracking the eggs into the center of the cake mix and pouring the oil on top. Stir by hand or with a paddle attachment until everything is combined into a cohesive, slightly tacky dough.
Pro Tip: The dough should be glossy and sticky, not dry or powdery — it will hold together when pinched.
Step 2: Add the Kelly green gel food coloring and mix until evenly combined.
Add the gel a little at a time to control the shade. Scrape the bowl sides and mix until color is uniform throughout the dough.
Pro Tip: The color should be a bright, even green with no streaks; if it looks muted, a tiny pinch more gel deepens the hue.
Step 3: Cover and chill the dough for 30 minutes.
Refrigeration firms the dough for easier scooping and slows spreading during baking. Wrap the bowl or cover with plastic to prevent drying.
Pro Tip: After chilling, the dough will feel firmer and less sticky, making it simple to scoop into neat balls.
Step 4: Preheat the oven to 350°F and line a baking sheet with parchment paper.
A fully preheated oven gives reliable bake times and consistent crackle patterns on top. Use parchment to prevent sticking and promote even browning.
Pro Tip: The oven should register a steady 350°F; if your oven runs hot or cold, adjust time by a minute or two and watch the first batch.
Step 5: Prepare granulated and powdered sugar in separate bowls.
Use small shallow bowls so you can roll dough balls easily. This two-stage coating creates the classic crackled powdered sugar look.
Pro Tip: The granulated sugar adds initial texture; it should fully coat the ball before you dust with powdered sugar.
Step 6: Scoop dough into tablespoon-sized balls and roll in granulated sugar, then in powdered sugar.
Use a tablespoon or small cookie scoop for uniform cookies. First roll in granulated sugar, then lightly press and roll in powdered sugar for the crackle effect.
Pro Tip: The outer surface should look fully coated in white powdered sugar with some underlying green peeking through.
Step 7: Place the dough balls on the baking sheet, spaced 2 inches apart.
Space ensures even heat and prevents cookies from merging. Aim for consistent spacing for uniform baking.
Pro Tip: The cookies won’t spread wildly; you should see rounded domes with a few cracks forming during bake.
Step 8: Bake for 9–12 minutes until tops are crackled.
Check at 9 minutes; the tops should have visible cracks and the edges may begin to set. Avoid overbaking to keep centers soft.
Pro Tip: The tops should look matte with defined crackles, not glossy or wet.
Step 9: Cool on the baking sheet for 5 minutes, then transfer to a wire rack to cool completely.
Cooling briefly lets the cookies set, then moving to a rack prevents sogginess. Serve once fully cooled to avoid powdered sugar clumping.
Pro Tip: After 5 minutes, cookies should lift cleanly from the parchment and hold their shape.
Step 10: Store in an airtight container at room temperature for up to 5 days or freeze for longer storage.
Keep cookies in a single or double layer separated by parchment to protect the powdered surface. Freeze baked cookies in a freezer-safe container for best results.
Pro Tip: Room-temp cookies should feel tender and slightly springy when squeezed, not hard.
Expert Tips for Easy St. Patrick’s Day Cookies
- Use gel food coloring for punchy color without extra moisture. A little goes a long way.
- Chill the dough to prevent flat cookies and to make rolling easier. Even 20–30 minutes helps.
- If you want a brighter green, add color gradually; darker shades can taste slightly artificial if overused.
- For the softest centers, err on the side of slightly underbaking and let residual heat finish the set.
- Use an oven thermometer to confirm accurate temperature — small ovens vary by 10–25°F.
- Swap vegetable oil with melted light butter for a richer, slightly crisper edge, but expect a firmer crumb.
- Use a small cookie scoop for consistent sizes and even baking across the tray.
- Common mistake: overmixing the dough. Mix until just combined; overworking develops a tougher texture.
(hint: for a complementary holiday recipe, try a stuffed carrot cake cookie variation for spring celebrations stuffed carrot cake cookies)
Storage & Freezing for Easy St. Patrick’s Day Cookies
Room temperature storage: Place cooled cookies in an airtight container layered with parchment paper. Store at room temperature for up to 5 days. Refrigerating is unnecessary and can dry cookies out.
Freezer storage: Freeze baked cookies in a single layer on a tray until solid, then transfer to a freezer-safe container or zip-top bag. Keep for up to 3 months. For dough, shape balls and freeze on a tray, then store in a labeled container for up to 2 months.
Thawing: Thaw frozen baked cookies on the counter for 30–60 minutes. For dough, bake from frozen adding 1–2 minutes to the bake time.
Reheating: Warm cookies for 5–8 seconds in a microwave (on a microwave-safe plate) to refresh softness, or 3–4 minutes at 300°F in the oven for a freshly-baked feel.
Variations & Substitutions for Easy St. Patrick’s Day Cookies
Mint-chocolate variation
Stir 1/2 teaspoon peppermint extract into the dough and add 1/3 cup mini chocolate chips. The peppermint brightens the cookie and the chips add melty pockets of chocolate.
Lemon-green version
Add 1 teaspoon lemon zest and 1/8 teaspoon lemon extract for a fresh citrus twist. The lemon lifts the sweetness and pairs surprisingly well with the powdered sugar coating.
Buttery cookie swap
Replace vegetable oil with 1/3 cup melted unsalted butter for richer flavor and slightly crisper edges. Expect a more buttery aroma and a firmer structure.
Sprinkle-topped party cookies
After rolling in powdered sugar, press a few green and white sprinkles onto the top before baking. You’ll get a festive look and a slight crunch from the sprinkles without changing the basic cookie.
Frequently Asked Questions About Easy St. Patrick’s Day Cookies
Q: Can I make these cookies without a boxed cake mix?
A: Yes, but you’ll need to replicate the cake mix balance of flour, sugar, and leaveners. Use 1 1/4 cups all-purpose flour, 3/4 cup granulated sugar, 1 1/2 teaspoons baking powder, and a pinch of salt as a starting point, then proceed with the eggs and oil. Expect slightly different texture; the store-bought mix is optimized for moist, tender results.
Q: How do I get the best green color without metallic or bitter flavor?
A: Use gel food coloring and add it gradually. A quarter-teaspoon usually gives a vivid Kelly green. Avoid using too much concentrated dye or poorly made liquid color, which can leave an off-taste.
Q: Why did my cookies spread too much and lose their crackle?
A: Overly warm dough, too much oil, or insufficient chilling can cause spreading. Make sure to chill the dough for at least 20–30 minutes and measure oil accurately. Also check that your oven temperature is correct.
Q: Can I make these gluten-free?
A: Substitute the boxed cake mix with a gluten-free white cake mix and ensure other ingredients are certified gluten-free. Texture may be slightly different; some gluten-free mixes benefit from a tablespoon of xanthan gum or an added egg white for structure.
Q: How do I preserve the powdered sugar coating when storing cookies?
A: Layer cookies with parchment paper in an airtight container and store at room temperature. Avoid refrigeration which can cause moisture and clumping of the powdered sugar. If powdered sugar absorbs humidity, a quick dusting before serving refreshes the appearance.

Final Thoughts on Easy St. Patrick’s Day Cookies
These Easy St. Patrick’s Day Cookies are perfect for last-minute celebrations and bakers who want big color with minimal fuss. They’re simple to make, forgiving to bake, and fun to share.
Please leave a star rating in the recipe card below and pin this recipe to Pinterest to save it for your holiday baking.
For more festive cookie inspiration, check out this green-themed tutorial at St. Patrick’s Day Shamrock Cookies – Sally’s Baking Addiction.
If you want another quick boxed-mix St. Patrick’s recipe, see a similar approach at Easy St. Patrick’s Day Cookies.
For a simple family-friendly take on holiday cookies, this roundup is also a helpful read: Easy St. Patrick’s Day Cookies – Scattered Thoughts of a Crafty Mom.
Easy St. Patrick’s Day Cookies
Ingredients
Method
- Mix the cake mix, eggs, and vegetable oil in a large mixing bowl until a sticky dough forms.
- Add the Kelly green gel food coloring and mix until evenly combined.
- Cover and chill the dough for 30 minutes.
- Preheat the oven to 350°F and line a baking sheet with parchment paper.
- Prepare bowls of granulated and powdered sugar.
- Scoop dough into tablespoon-sized balls and roll in granulated sugar, then in powdered sugar.
- Place the dough balls on the baking sheet, spaced 2 inches apart.
- Bake for 9-12 minutes until tops are crackled.
- Cool on the baking sheet for 5 minutes, then transfer to a wire rack to cool completely.
- Store in an airtight container at room temperature for up to 5 days or freeze for longer storage.