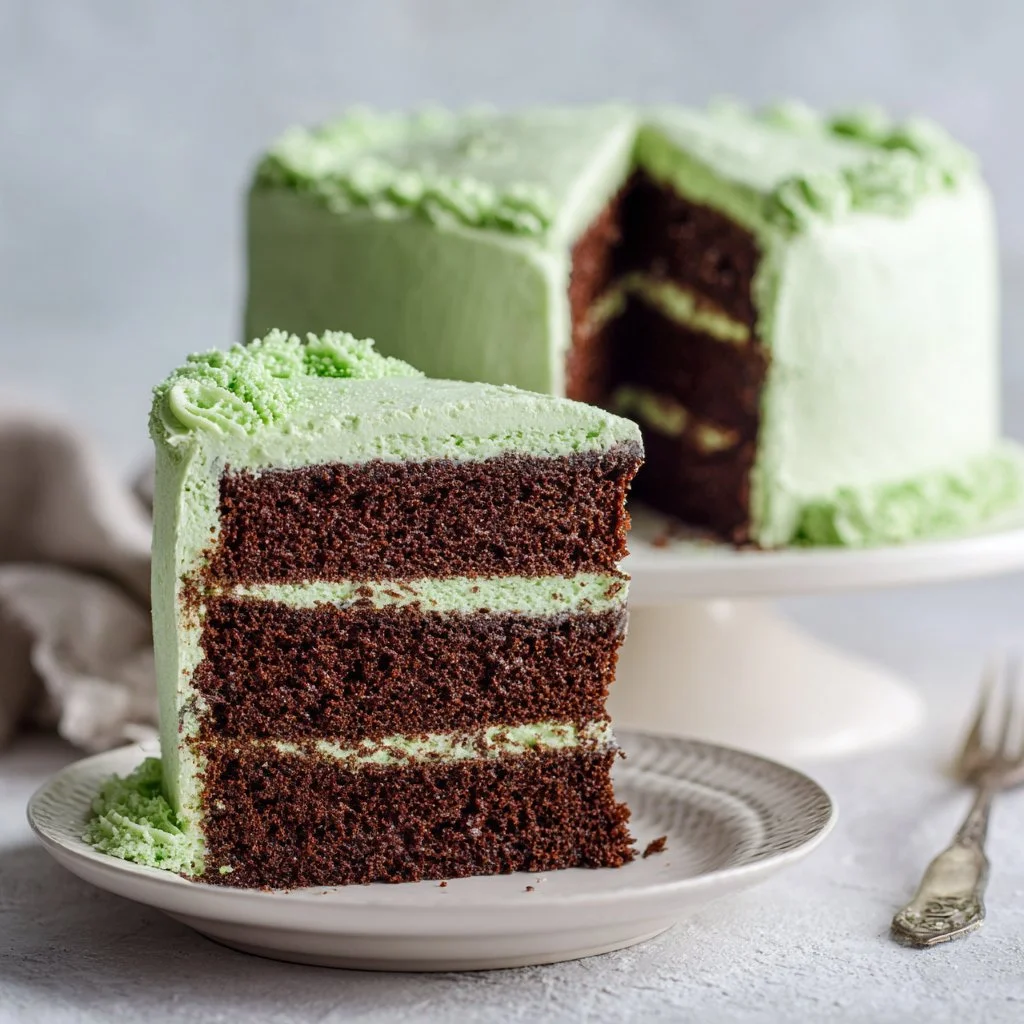
Bright, surprisingly tender, and festive, this Green Velvet Cake is a show-stopper for holidays and celebrations. The crumb is moist, the crumb color is vivid, and the frosting is silky and stable.
This recipe balances classic velvet-cake ingredients with a simple cooked-flour frosting that whips to a light, buttery cloud. If you like slightly chocolatey velvet cakes with a bold color, you’ll love how this one slices and photographs.
Want a sweet breakfast pivot or another celebratory cake idea while you bake? Try this cottage cheese pancake recipe as a post-bake treat.
Why You’ll Love This Green Velvet Cake Recipe
- Bold, festive green color without heavy dyes that taste metallic.
- Velvety, tender crumb that holds up to layered frosting.
- Cooked-flour frosting that is less sweet and more stable than classic buttercream.
- Simple, pantry-friendly ingredients with a clear technique.
- Great for stacking and decorating for parties or seasonal shows.
- Frosting whips into a light, almost whipped-cream texture but keeps shape.
The taste is lightly chocolateed with a subtle tang from the buttermilk. Texture-wise it’s soft and moist with a fine crumb that cuts cleanly when chilled briefly before slicing.
“Absolutely stunning and easy to follow — the cake was moist and the frosting light. My guests couldn’t stop asking for the recipe!” — 5⭐ reader review
Key Ingredients for Green Velvet Cake Recipe
Flour: All-purpose flour gives structure and a tender crumb when measured correctly. Buy a branded all-purpose flour with consistent protein (10–11%) for predictable rise; if you substitute cake flour, reduce the amount slightly because cake flour absorbs less and the crumb will be even softer.
Buttermilk: Buttermilk adds acidity and moisture, which react with baking soda to create lift and a tender crumb. If you don’t have cultured buttermilk, make a substitute with 1 tablespoon lemon juice or vinegar plus enough milk to make 1 1/4 cups; the acid is what matters more than the culture.
Unsweetened cocoa powder: A small amount of natural cocoa deepens flavor and helps the green color read as “velvet” instead of flat green. Use natural cocoa (not Dutch-processed) as the leavening relies on acidity; Dutch-process will neutralize the reaction and change rise.
Green liquid food coloring: Liquid coloring disperses easily for uniform hue with minimal mixing. If you prefer cleaner color without changing batter viscosity, use gel food coloring in smaller amounts; start with half the gel amount and add more to taste to avoid an over-concentrated dye.
Full Ingredient List for Green Velvet Cake Recipe
- 2 1/2 cups all-purpose flour
- 2 tablespoons unsweetened cocoa powder (not Dutch process)
- 1 teaspoon baking powder
- 1/2 teaspoon baking soda
- 1/2 teaspoon fine salt
- 1 1/4 cups buttermilk, well shaken
- 1 tablespoon green liquid food coloring
- 2 teaspoons pure vanilla extract
- 2 cups granulated sugar
- 1 cup (2 sticks) unsalted butter, at room temperature
- 3 large eggs, lightly beaten
- 1/2 cup all-purpose flour (for frosting)
- 1 1/2 cups milk
- 1 1/2 cups (3 sticks) unsalted butter, at room temperature
- 1 1/2 cups granulated sugar (for frosting)
- 4 teaspoons pure vanilla extract (for frosting)
- Pinch fine salt
- Green candies and sanding sugar for decorating
Step-by-Step Instructions for Green Velvet Cake Recipe
Step 1: Prepare pans and preheat
Preheat the oven to 375°F and butter three 8-inch round cake pans, line them with parchment, and butter the parchment. Properly prepared pans ensure the cake releases cleanly after baking.
Pro Tip: The parchment should sit flat with buttered edges; batter will fill evenly and you’ll see smooth domes before baking.
Step 2: Combine dry ingredients
In a large bowl, whisk together 2 1/2 cups flour, 2 tablespoons unsweetened cocoa powder, 1 teaspoon baking powder, 1/2 teaspoon baking soda, and 1/2 teaspoon fine salt until evenly blended. Sifting or vigorous whisking prevents clumps and distributes the cocoa so the color is uniform.
Pro Tip: The dry mix should look homogenous with no cocoa streaks; it will smell subtly chocolatey.
Step 3: Mix wet color blend
Measure 1 1/4 cups well-shaken buttermilk, stir in 1 tablespoon green liquid food coloring and 2 teaspoons vanilla extract until the color is even. This liquid will be alternated into the batter to avoid overmixing.
Pro Tip: The buttermilk mix should be a consistent shade with no streaky darker green.
Step 4: Cream butter and sugar
Cream 1 cup (2 sticks) unsalted butter at room temperature with 2 cups granulated sugar for about 5 minutes until light and fluffy. Proper creaming incorporates air and leads to a lighter crumb.
Pro Tip: The mixture should be pale, doubled in volume, and feel airy when you lift the paddle.
Step 5: Add eggs
Slowly beat in the 3 lightly beaten large eggs, adding them in a steady stream and scraping the bowl as needed. Adding eggs slowly keeps the emulsion stable and prevents curdling.
Pro Tip: Batter should look smooth and glossy; if it looks separated, beat a little longer until uniform.
Step 6: Alternate dry and wet additions
Alternate adding the flour mixture and buttermilk mixture to the butter-egg batter, beginning and ending with flour. Mix on low speed and stir just until combined to avoid developing gluten.
Pro Tip: The final batter will be thick but pourable and have a uniform green color; there should be no streaks of flour.
Step 7: Bake
Divide the batter evenly into the three prepared pans and bake for 20–25 minutes, or until a toothpick inserted into the center comes out with moist crumbs. Let the layers cool completely on wire racks before frosting.
Pro Tip: Tops should spring back lightly and edges will pull away from the pan slightly; centers will not jiggle.
Step 8: Make the cooked-flour frosting base
Whisk 1/2 cup flour into 1/2 cup milk in a small saucepan to form a smooth paste, then whisk in the remaining 1 cup of milk. Cook over medium heat, whisking constantly, until the mixture becomes very thick, about 5 minutes.
Pro Tip: The paste will transform from thin to pudding-thick; it should coat the back of a spoon.
Step 9: Chill the frosting base
Transfer the thickened milk-flour mixture to a bowl, press plastic wrap directly onto the surface to prevent a skin, and chill in the fridge for 45 minutes until fully cooled.
Pro Tip: The surface should be fully cold and slightly firm to the touch before adding to butter.
Step 10: Beat frosting butter and sugar
Beat 1 1/2 cups butter and 1 1/2 cups sugar for 5 minutes until light and creamy. Add the cooled flour paste one tablespoon at a time while beating to maintain a stable emulsion.
Pro Tip: Frosting will look smooth and spreadable before the final whip; if it seems curdled, add a tablespoon of chilled paste and beat to homogenize.
Step 11: Whip frosting to finish
Switch to the whisk attachment and whip the frosting for 10 minutes until light, fluffy, and stable. Add 4 teaspoons vanilla extract and a pinch of salt, and taste for balance.
Pro Tip: Finished frosting should hold soft peaks and spread without sliding; it will be lighter in color and texture.
Step 12: Assemble the cake
Frost between the three cooled layers and on the outside. Smooth with an offset spatula and decorate with green candies and sanding sugar as desired.
Pro Tip: The cake looks best after a 20–30 minute chill to set the crumb coat; edges will be clean and decorations will stick.
Expert Tips for Green Velvet Cake Recipe
- Room temperature ingredients: Bring eggs and butter to room temperature for proper emulsion and even rise.
- Oven temperature check: Use an oven thermometer to ensure your oven reads 375°F; many ovens run hot or cold and a 25°F difference will alter bake time.
- Texture troubleshooting: If crumb is dense, you likely overmixed after adding flour; mix only until combined and fold gently if needed.
- Frosting separation fix: If the cooked-flour paste is warm when added to butter it can separate; always fully chill the paste and add slowly.
- Equipment tip — mixer speeds: Use low speed when combining dry and wet ingredients to avoid flour puff and gluten formation; reserve medium-high speed for whipping frosting only.
- Cooling tip: Cool layers on a rack and remove from pans after 10–15 minutes to avoid soggy sides from trapped steam.
- Common mistake — food coloring overuse: Adding too much liquid dye can thin batter and change flavor; prefer gel dyes if you need more pigment and add sparingly.
- Decoration stability: Chill the cake briefly between crumb coat and final coat for neat edges and cleaner slicing.
Storage & Freezing for Green Velvet Cake Recipe
Fridge storage: Store covered in the refrigerator for up to 4 days in an airtight cake carrier or wrapped tightly in plastic wrap. Keep frosting out of direct air to prevent drying.
Freezer storage: Freeze whole cakes or individual layers for up to 3 months. Wrap each fully cooled layer in plastic wrap and then aluminum foil, or place in freezer-safe containers.
Thawing: Thaw frozen layers overnight in the fridge still wrapped. For quicker thaw, leave in the fridge for 4–6 hours then unwrap.
Reheating: This cake is best served at room temperature; remove from the fridge 30–60 minutes before serving. Avoid microwaving whole slices; if desired, warm a slice for 8–10 seconds to soften chilled frosting.
Variations & Substitutions for Green Velvet Cake Recipe
Mint-Chocolate Green Velvet: Add 1/2 teaspoon peppermint extract to the batter and swap the 2 tablespoons cocoa for 3 tablespoons for a stronger chocolate presence. This creates a mint-chocolate profile and a darker crumb.
Matcha Green Velvet: Replace the green food coloring with 2–3 tablespoons sifted culinary matcha and omit the cocoa. Expect an earthy, slightly bitter note and a more muted green; reduce sugar by 2 tablespoons if needed.
Cupcake format: Bake in a standard 12-cup muffin tin at 350°F for 16–18 minutes. Cupcakes bake faster and are great for portion control; liners and a simple swirl of the cooked-flour frosting work beautifully.
Citrus-bright frosting: Add 1 teaspoon finely grated lemon zest and 1 teaspoon lemon juice to the frosting for a brighter finish. This cuts sweetness and pairs nicely with the tang from the buttermilk.
Frequently Asked Questions About Green Velvet Cake Recipe
Q: Can I use gel food coloring instead of liquid for Green Velvet Cake Recipe?
A: Yes, gel coloring is concentrated and will give a deeper hue with less volume. Start with half the amount called for in the recipe and add a little more until you reach the desired shade. Gel won’t thin the batter the way extra liquid dyes can.
Q: Why is there cocoa in Green Velvet Cake Recipe and can I skip it?
A: The small amount of natural cocoa adds depth and enhances the velvet flavor without making the cake chocolate. Skipping it will make the cake flatter in flavor; if you omit it, consider adding 1/2 teaspoon more vanilla or a pinch of salt to balance taste.
Q: How do I prevent the layers from doming while baking Green Velvet Cake Recipe?
A: Use even oven temperature, fill pans evenly, and consider lowering oven temperature by 15–25°F if your layers dome excessively. You can also use baking strips or gently level domes with a serrated knife after cooling.
Q: Is the cooked-flour frosting safe to make ahead for Green Velvet Cake Recipe?
A: Yes — the cooked-flour base can be made and chilled up to 48 hours before assembling, covered with plastic on the surface. Finish by whipping with butter and sugar right before decorating for best texture.
Q: Can I make Green Velvet Cake Recipe dairy-free or vegan?
A: Converting requires swaps: use a plant-based buttermilk (1 1/4 cups non-dairy milk plus acid) and dairy-free butter alternatives that whip well. The cooked-flour frosting relies on butter for structure; use a high-quality vegan butter and stabilize with a touch more powdered sugar or cornstarch.
Final Thoughts on Green Velvet Cake Recipe
This Green Velvet Cake Recipe is a vibrant, reliable showpiece with a tender crumb and a silky, stable frosting. If you enjoyed it, please leave a star rating in the recipe card below and pin it to Pinterest for later.
For inspiration on other green-tinged desserts try this Green Velvet Cake – The Itsy-Bitsy Kitchen, explore frosting technique tips at Green Velvet Cake – Sprinkle Bakes, or compare variations in Green Velvet Cake And Cupcakes – Love From The Oven.

Green Velvet Cake
Ingredients
Method
- Preheat the oven to 375°F, butter three 8-inch round cake pans, line them with parchment, and butter the parchment.
- In a large bowl, whisk together flour, cocoa powder, baking powder, baking soda, and salt until evenly blended.
- In a bowl, stir together buttermilk, green food coloring, and vanilla extract until the color is even.
- In a mixer, cream butter and sugar for about 5 minutes until light and fluffy.
- Slowly beat in the eggs in a steady stream while scraping the bowl as needed.
- Alternate adding the flour mixture and buttermilk mixture to the butter-egg batter, beginning and ending with flour.
- Divide the batter evenly into the prepared pans and bake for 20-25 minutes.
- Whisk flour into milk in a saucepan to form a paste, then cook and whisk over medium heat until very thick.
- Transfer the thickened mixture to a bowl and chill in the fridge for 45 minutes.
- Beat butter and sugar for 5 minutes until light and creamy, then add the cooled flour paste gradually.
- Switch to a whisk attachment and whip frosting for 10 minutes until light and fluffy.
- Frost between the cooled layers and on the outside, decorating with candies and sanding sugar as desired.